In the United States, there are more than 100 million
housing units, and the majority of them are "single family
dwellings," or houses. In cities, in the suburbs and in rural
communities, houses are a very common sight.
Have you ever wondered how a house is built? What holds up
the ceilings and the walls? What keeps the rain out? What
parts go into making a house? How many different people are
involved when a house goes up? If you would like to know the
answers to questions like these, or if you have simply been
curious to know all the steps that go into making a new home,
then read on! In this edition of HowStuffWorks,
you'll learn exactly how houses are built!
Setting the Stage
So let's start at the
beginning. What is a house? According to The American Heritage
Dictionary of the English Language, a house is "A structure
serving as a dwelling for one or more persons, especially for
a family." You probably have a very specific mental image of
the "typical house." It is a structure on its own piece of
land, generally with a lawn and plants outside. It has a
pitched roof, walls covered in brick or siding, windows and
doors. Inside there are rooms like the kitchen, the living
room, bedrooms and bathrooms.
I can show you a hundred pictures of houses and they may
all be completely different in their specifics, but they will
all share those basic characteristics.
Steps to Building a House
One of the amazing
things about American homes is that the huge majority of them
are built using completely standardized building practices.
One reason for this consistency is a set of uniform building
codes that apply across the country. Another reason is cost --
the techniques used to build homes produce reliable housing
quickly at a low cost (relatively speaking). If you ever watch
any house being built, you will find that it goes through the
following steps:
- Grading and site preparation
- Foundation construction
- Framing
- Installation of windows and doors
- Roofing
- Siding
- Rough electrical
- Rough plumbing
- Rough HVAC
- Insulation
- Drywall
- Underlayment
- Trim
- Painting
- Finish electrical
- Bathroom and kitchen counters and cabinets
- Finish plumbing
- Carpet and flooring
- Finish HVAC
- Hookup to water main, or well drilling
- Hookup to sewer or installation of a septic
system
- Punch list
Many of these steps are performed by independent crews
known as subcontractors. For example, the framing is
generally done by one subcontractor specializing in framing,
while the roofing is done by a completely different
subcontractor specializing in roofing. Each subcontractor is
an independent business. All of the subcontractors are
coordinated by a contractor who oversees the job and is
responsible for completing the house on time and on budget.
We will walk through these different stages so that you can
see what is involved, understand all the steps and learn about
the different materials used in the construction process. We
will use a typical three-bedroom home as our example.
Site Preparation
The first crew on the site
handles site preparation. Often, this crew and the foundation
crew are the same people, but sometimes not (especially if
there are a lot of trees on the lot). Houses are generally
built on a foundation that is either a basement, a
crawl space or a slab. The site-preparation crew
typically arrives on the site with a backhoe
and/or bulldozer. The crew's job is to clear the site of any
trees, rocks and debris, level the site if necessary and dig
as necessary for the foundation being built.
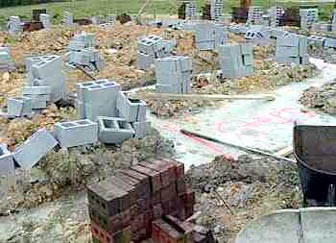
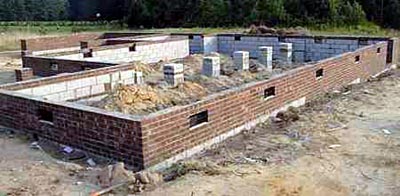
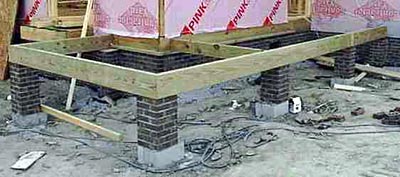
The example house shown here is built on a crawl space. For
a crawl space, the site preparation crew digs a set of
trenches and holes. Concrete is poured into these
trenches and holes and will act as the interface between the
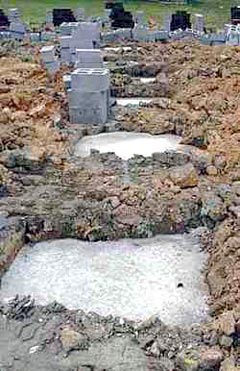
foundation wall and the ground. Once the concrete is poured,
the house looks like this:
(In these pictures, the bricks for the crawl space have
already been moved into position while the concrete cures.)
The concrete in the trench is generally about 18 to 24 inches
wide (45.72 to 60.96 cm) and 18 to 24 inches deep. Once it
hardens, it forms a massive concrete "beam" on which the house
rests. The width of this concrete beam is controlled by
the compressibility of the soil. In light soils, the beam will
be wider to try to spread out the load, while in heavy clay
soils it can be narrower.
If the site slopes, the concrete beam is stepped,
like this:
Concrete takes approximately two weeks to cure to full
strength (depending on the weather), so once the concrete is
poured nothing will happen for some period of time while
curing takes place.
If this house had been built on a basement, the
site-prep crew would have dug a square hole about 8 feet deep.
If this house had been built on a slab, the site-prep
crew would have trenched around the outside approximately 2
feet deep and then completely leveled the area for the pad.
Foundation
Basements, crawl spaces and slabs
are the three main foundation systems used on houses. In wet
and coastal areas, it is sometimes common to put houses up on
posts as well.
Slab
The slab is
probably the easiest foundation to build. It is a flat
concrete pad poured directly on the ground. It takes very
little site preparation, very little formwork for the concrete
and very little labor to create. It works well on level sites
in warmer climates -- it has problems up north because the
ground freezes in the winter and this freezing can shift the
slab at worst and at least lead to cold floors in the winter.
A cross-section of a typical slab looks like this:
 |
Around the edge of the slab, the concrete forms a beam that
is perhaps 2 feet deep. The rest of the slab is 4 or 6 inches
thick. A 4- or 6-inch layer of gravel lies beneath the slab. A
4-millimeter sheet of plastic lies between the concrete and
the gravel to keep moisture out. Embedded in the concrete is
6-inch by 6-inch wire mesh (shown by the dotted line in the
slab) and steel reinforcing bars (shown by the white circles
at the bottom of the beams). You will often hear this sort of
foundation referred to as a "floating slab" -- it
"floats" on the soil, with the deeper concrete around the edge
holding it in place. In northern climates, the concrete around
the edge has to extend deep enough to remain below the frost
line in winter.
One thing about a slab is that the sewer pipe,
and sometimes much of the electrical conduit, has to be put in
place before the concrete is poured. The sewer pipes are
actually embedded in the slab.
Basement
A house with a
basement starts with a hole about 8 feet deep. At the
bottom of the hole is a concrete slab, and then concrete or
cinder-block walls form the outer walls of the basement.
Actually, a basement is poured in three pieces in most cases:
the "beams," then the walls, and then the slab inside the
walls, like this:
This approach helps keep the basement waterproof. The
L-shaped piece is a steel reinforcing bar to bind the beam and
the wall together.
Crawl Space
A crawl
space has several advantages over basements and slabs:
- It gets the house up off the ground (especially
important in damp or termite-prone areas).
- It is a lot less expensive than a basement and
comparable in price to a slab.
- Duct work and plumbing can run in the crawl space,
meaning that they are easy to service and move over the
lifetime of the house.
Most of the time, a crawl
space is made of cinder block with a brick facing, as shown in
the image on the right.
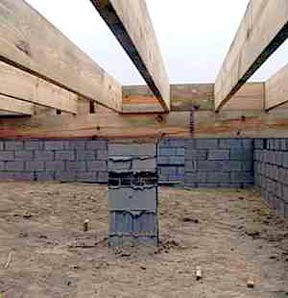
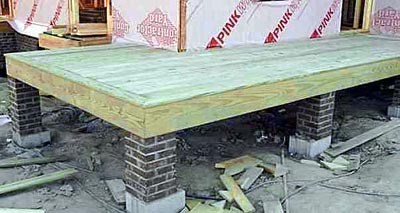
This is exactly how our sample house is put together. Here
is how the finished foundation looks:
You might have noticed in the previous pictures that the
concrete work for the crawl space was not done with much
precision at all. One of the neat things that the mason
(bricklayer) does is carefully adjust the height of the cinder
blocks and bricks with mortar thickness so that the
crawl-space walls end up exactly level all the way around.
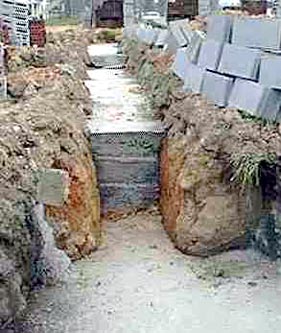
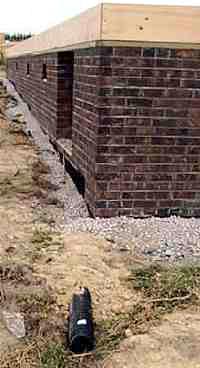
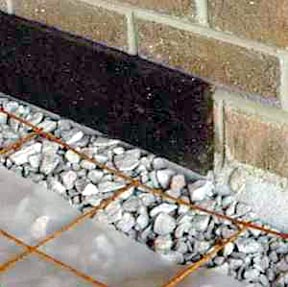
One problem that arises in crawl spaces and basements is
dampness. In order to keep water out, perforated pipe and
gravel are used in a trench around the crawl space to route
water away. The drainage system looks like this:
In a house with a basement, this same sort of drainage
system is added along the bottom of the walls. The basement
walls are then generally insulated with rigid foam board and
then heavily waterproofed before dirt is backfilled against
the walls.
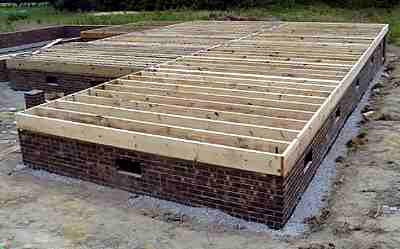
Floor
The framing crew is the next group of
people on the site. They start by building the floor (unless
the house uses a slab foundation, in which case the slab is
the floor). The floor framing looks like this:
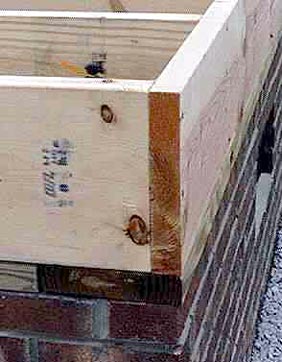
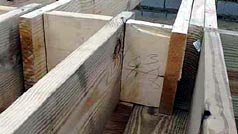
The floor starts with a sill-plate made of pressure-treated
lumber in direct contact with the bricks of the crawl
space wall. One interesting thing to note is that this house
literally "sits" on the foundation -- it is not held on or
bolted on in any way. Then the floor is constructed on the
sill with 2x10 lumber:
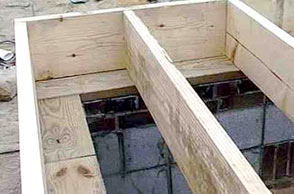
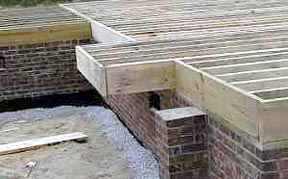
You may have noticed the brick posts when you saw
the picture of the foundation. They hold a beam that runs down
the center of the house. The beam is also built from 2x10
lumber (three pieces thick):
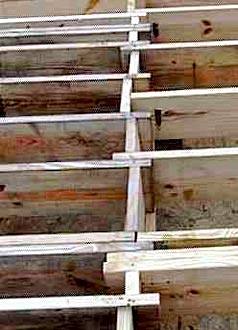
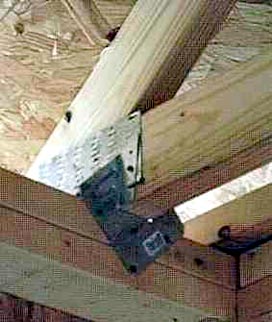
All of the "joists" (as the 2x10s in the floor are
called) meet on this center beam:
(In many houses the meeting of the joists is somewhat
better organized!)
This funny little cantilevered section of the frame will
eventually hold the fireplace:
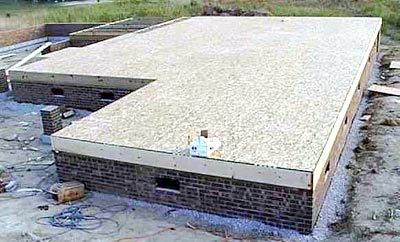
Once the floor framing is complete, it is covered with
1/2-inch or 5/8-inch plywood or OSB (oriented strand board).
And the floor is finished!
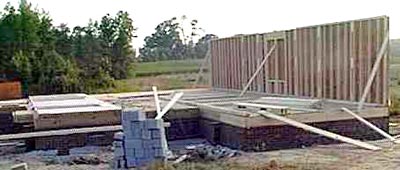
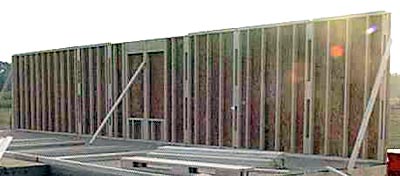
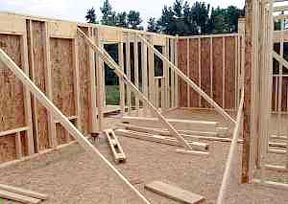
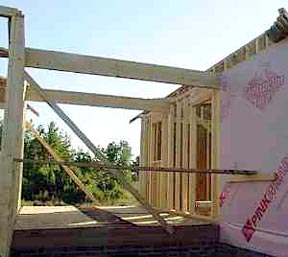
Walls
The framing crew next starts on the
walls. Walls are assembled on the floor...
...and then raised into place. Here's what the first wall
looks like once it is up:
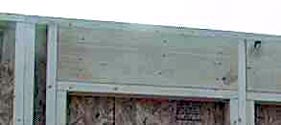
You can see that this wall is made of 2x4 lumber and
covered on the outside with an OSB sheathing. Using
plywood or OSB as the sheathing gives the wall rigidity -- you
may have seen diagonal pieces used at the corners of older
homes (homes built before plywood was widely available). The
plywood does the same thing, but it provides much more
strength.
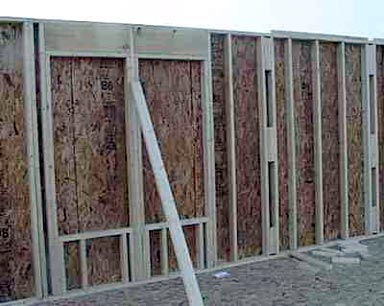
The 2x4s are placed on "16-inch centers," meaning
that the center of one 2x4 is 16 inches away from the center
of the next. In this wall, two things interrupt the consistent
16-inch pattern:
- Windows
- Special framing that will accommodate internal walls
once they are built
Here's a shot that shows these
two features in better detail:
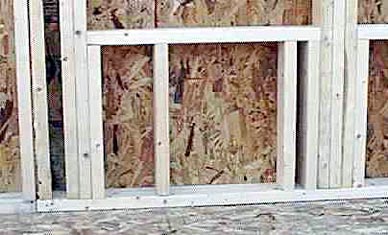
The plywood will be cut out of the window openings as
construction proceeds. Above the window is a 2x10
header, which is actually two 2x10s with a piece of
1/2-inch-thick plywood sandwiched in between and a 2x4 along
the bottom:
A
cross section of a header is shown at the right. The reason
why the header has plywood in the middle is simply to make the
header as wide as the rest of the wall. A 2x4 is really 1-1/2
inches by 3-1/2 inches, and a 2x10 is really 1-1/2 inches by
9-1/2 inches. When you sandwich two 2x10s together they are
only 3 inches wide. Adding the piece of plywood in between
makes the sandwich 3-1/2 inches wide.
A 2x10 header is a beam. You see these headers over all
windows and doors -- they give the wall enough strength over
the window or door to support the roof. When a header spans
more than 5 feet, you find double full-length studs on either
side of the header instead of the single studs seen here.
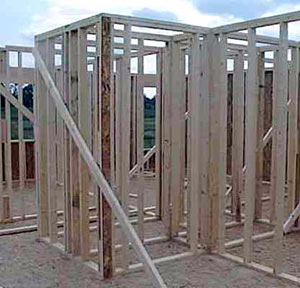
All of the exterior walls go up following this same basic
pattern. In the corners, the top plate on one wall
overlaps the top plate of the next, and the walls are nailed
together to bind the corner. Then the interior walls go up,
fitting into the top plates of the exterior walls as shown
above.
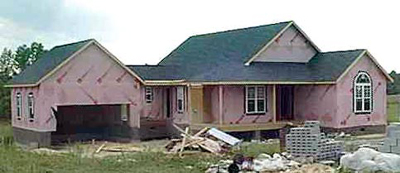
This house has a garage and a breezeway connecting the
garage to the house.
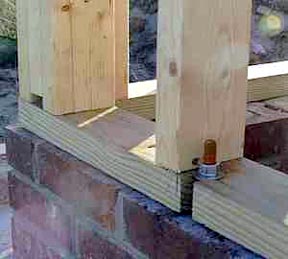
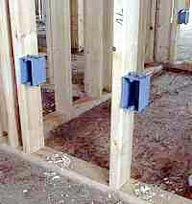
The walls of the garage are built slightly differently
(because the garage will have a slab floor). The walls are
bolted directly to the brick foundation walls:
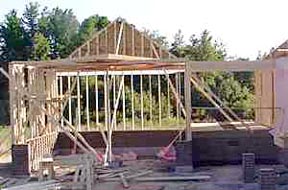
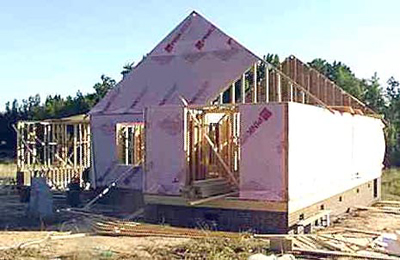
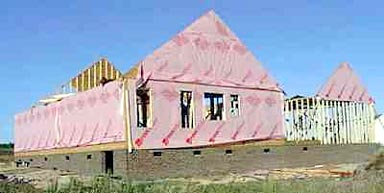
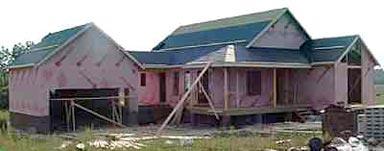
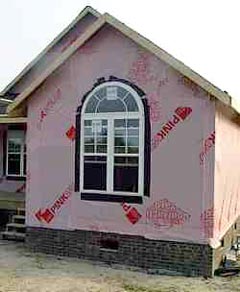
Here's how the house looks right before the roof framing
starts.
You can see that the framers have covered the outside walls
in pink house wrap.
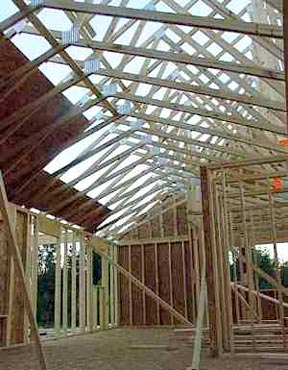
Roof
This house uses trusses for the
roof framing. Trusses are pre-fabricated, triangulated wooden
structures used to support the roof. The alternative is to
build up the roof's frame with 2x8s and 2x10s. Trusses are
quite common these days because they have five big advantages
from the builder's standpoint:
- Trusses are incredibly strong.
- Because they are built strictly from shorter lengths of
2x4 lumber, they are generally a lot less expensive than the
alternative.
- You can have just about any shape custom-built, and this
allows interesting features like cathedral ceilings at low
cost.
- You can span a large distance with a truss and the truss
transmits all of the weight to the exterior walls.
Therefore, none of the interior walls are "load-bearing," so
they can go anywhere and are easily moved later.
- Trusses go up quickly!
From the homeowner's
standpoint, the one big disadvantage is that you don't have
any attic space. C'est la vie...
Trusses come in several standard configurations:
"W" truss |
"M" truss |
"Scissors" truss |
"Gable" truss
|
Gable trusses are used at the ends of the roof (the
outermost trusses on either end). The vertical pieces are 16
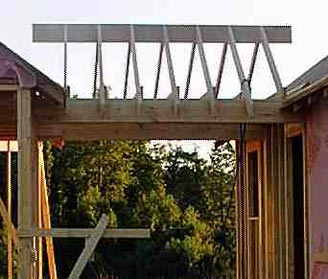
inches on center so that siding can be nailed on. Our sample
house uses a custom truss in the main part of the house that
looks like this:
The left-hand side will provide a cathedral ceiling over
the living room. Scissors trusses are used for the front room,
and M trusses are used over the garage. Gable trusses are used
at the ends of the three rooflines.
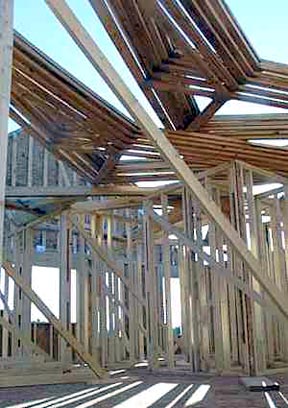
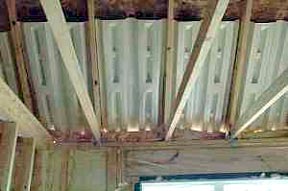
The trusses are fist stacked on top of the walls, either by
hand or with a crane.
These trusses went up in about four hours. They are on
24-inch centers.
The trusses are tied to the walls with small metal plates.
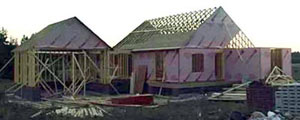
Once the trusses are up, the roof is covered in plywood or
OSB, which gives the roof tremendous rigidity.
There are two small custom roofs in this house: the roof
over the porch (see next section) and the roof over the
breezeway.
Roof framing without trusses is actually fairly
complicated. The angles found in anything but the simplest
roof become intricate. A book like Do
It Yourself Housebuilding by George Nash goes into roof
framing in incredible detail.
Porch
The crew built the porch, starting
with the frame.
Then a floor goes on top of the frame.
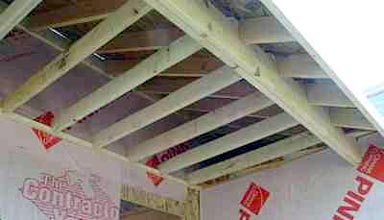
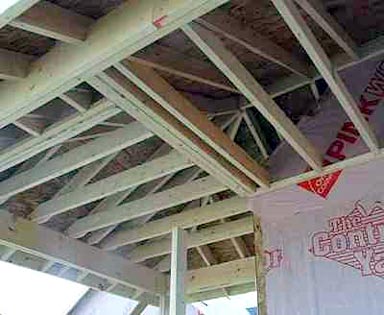
Here are the trusses of the roof over the porch:
Windows and Doors
Inside the house, things
are now beginning to look enclosed:
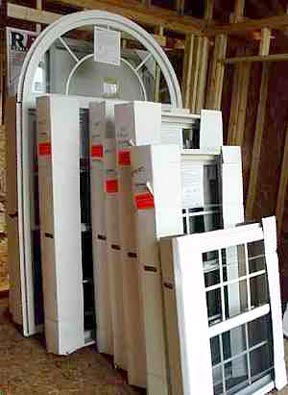
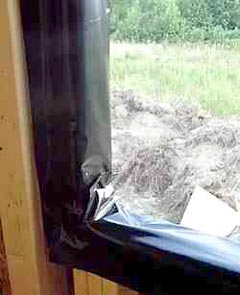
The next step in enclosure is windows and doors. The
windows and doors arrive in one shipment and are unloaded from
the truck into a stack:
Plastic stripping is stapled to the inside of all
window and door openings, like this:
The windows used here are standard vinyl windows. They are
placed in each rough opening and stapled in place on the
outside.
The front-most window is the feature window of this house:
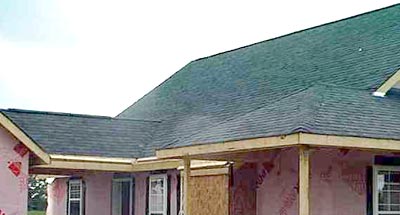
Roofing
This house uses standard asphalt
shingles for the roof. The first step is to cover the roof
with building paper (tar paper):
The shingles then go on very quickly (on this house, in
less than a day):
In the following shot you can barely detect the ridge
vent that runs along the peak of the breezeway roof. There
is a vent like this along the peak of all the roofs.
This vent replaces the triangular "gable-end vents" found
in older homes. Ridge vents give better circulation
(especially when cathedral ceilings are used) and also prevent
bats and
squirrels from getting into the attic.
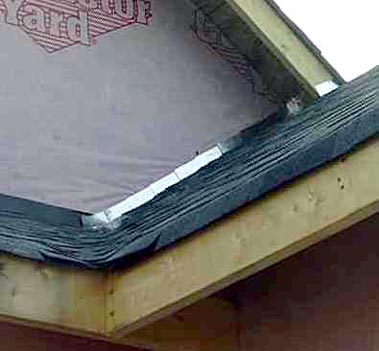
In the following shot, you can see the aluminum flashing
that keeps water away from the walls at the points where the
shingles touch the walls.
At the edge of the roof, the shingles are cut off with
about 2 inches of overhang:
Siding
This house uses standard vinyl
siding. The siding is made from thin, flexible sheets of
plastic about 2 millimeters thick, pre-colored and bent into
shape during manufacturing. The sheets are 12 feet long and
about a foot high. You start at the bottom and the sheets
interlock into each other as you go up.
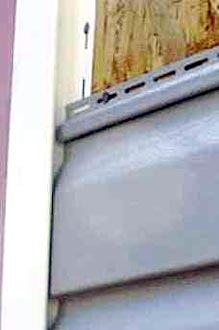
Because vinyl expands and contracts due to temperature and
sunlight, it fits into deep channels at the corners and
around windows and doors. The channels are deep enough that as
the siding contracts it remains within the channel. The
following shot shows a channel nailed to a corner of the house
and a piece of siding fitting into it. It is nailed in place
and ready for the next sheet to be interlocked and installed
above it:
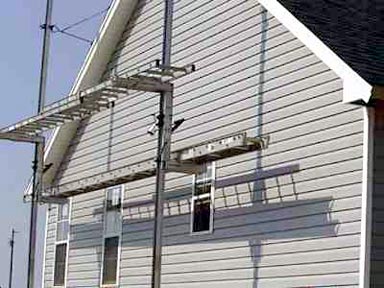
This is the back wall of the house, showing the scaffolding
used to install the siding:
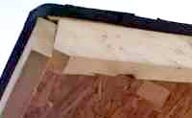
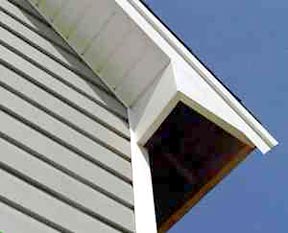
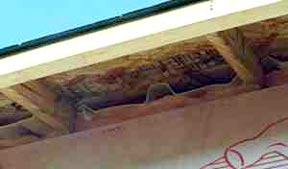
This shot shows roofline detail. The area extending out
from the house under the roof is known as the soffit
(parallel to the roof). The fascia boards are perpendicular to
the roof. The soffit is perforated so that air can flow into
the attic and up through the ridge vents to ventilate the
attic. In this shot, part of the soffit is in place, while
part is awaiting installation. Note that all exposed fascia
wood is capped with a sheet of painted aluminum that was bent
into shape on the site:
At this point, the house is "dried in," meaning that
it is completely protected from rain. Now interior work can
begin.
Rough Plumbing
Let's say you want to put a
toilet
in a house. Two-hundred or 300 years ago this was not an
option -- everyone used outhouses. If you visit the governor's
mansion in Williamsburg, VA, you will see that in the 1700s
even England's high colonial governor used a pair of
three-holer outhouses located at the back of the formal
garden. Eventually, public water supplies and pressurized well
systems allowed people to have indoor plumbing, and this
allowed for the addition of indoor toilets. A toilet has to
flush somewhere, so sewer
systems evolved.
Why can't you run the sewer line from a toilet or a sink
out of the side of the house so it spills on the ground? That
certainly would be easy and inexpensive, but people learned
fairly quickly that human waste spilled on the ground smells
bad and leads to incredible disease problems. Septic
tanks and sewer systems take care of this. The uniform
plumbing code lists hundreds of rules for septic-tank
installation. These rules ensure that tanks work properly over
many years.
Once you have a septic tank in place, you can add sewer
lines from the sink or toilet to the septic tank. Say you
tried this approach:
The problem with this approach is that as the septic tank
fills up with stuff, it produces a rather malodorous cloud of
fumes. These fumes float from the septic tank up the sewer
line to the sink and into the bathroom. Therefore, plumbing
codes require a "P-trap" at every drain opening, as
shown here:
You may have wondered why you find these funny loops of
pipe under every sink in your house. The idea is that water
gets trapped in the "P." This water blocks the fumes from the
septic tank and keeps them from entering the bathroom.
Unfortunately, a P-trap alone does not solve the problem
because it turns out that the fumes in a septic tank are under
pressure. The fumes simply bubble through the water in the
trap and cause the same problem. Therefore, there is the
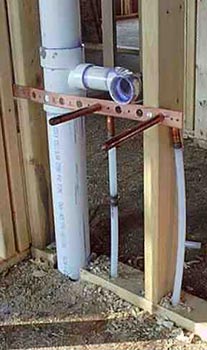
concept of a vent pipe, which allows the pressure to
escape, as shown here:
You may have wondered why houses have pipes sticking up out
of the roof. They are vent pipes to relieve the pressure so
that P-traps can do their jobs. It turns out that vents also
break vacuums so water flows down the pipes faster.
Besides covering P-traps and vent pipes, the uniform
plumbing code specifies all sorts of other things:
- The required diameters for pipes
- The allowed materials for pipes
- The types of joints you can use
- The necessary supports for pipes
- The angle at which pipes must fall
- The longest distance for lateral pipes
- And on and on and on through hundreds of pages
When plumbers follow all the rules, they are able to create
extremely reliable and safe plumbing systems. Over time, new
rules get added as people realize funny little quirks and
nuances. These new rules prevent problems in the future, and
each one makes the code a little bigger and better.
This is all a nice way to say that, even though plumbing
looks simple in this section, there are many subtleties
and nuances dictated by code that plumbers know and neophytes
generally do not. (The same holds true for electrical systems,
by the way.)
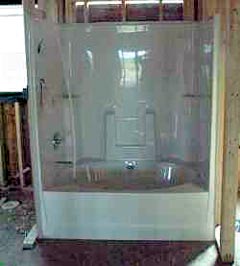
Rough plumbing involves installing all of the water lines,
sewer lines and bathtubs. Tubs are normally installed early
because:
- One-piece shower-and-tub units are big and often cannot
be maneuvered into place later in the construction cycle.
They also frequently "change size" -- that is, the size
drawn on the plans and the size delivered often differ
significantly.
- A full tub is heavy. Therefore, the tub is installed and
filled so that the frame can settle quickly. This step
prevents cracked walls and tile the first time someone uses
the tub.
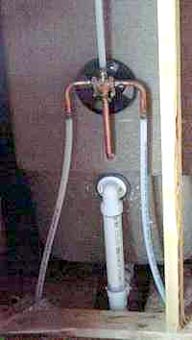
Typically, rough plumbing involves installing all sewer
lines and vents as well as all water supply lines for each
fixture. Here's a typical sink fixture:
Here's the fixture for a washer:
The tub is put in place and filled. Note the framing
problem being corrected on the left side of the tub because
the tub changed size:
Here are the lines for the tub:
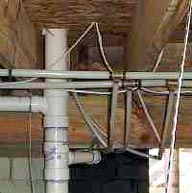
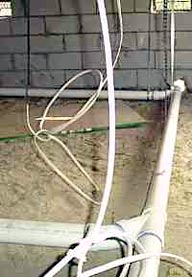
In the crawl space, the supply lines all branch off from
common pipes running the length of the house:
The sewer lines all join together...
... and then exit out the back of the house, ready for
connection to the septic tank:
Rough Electrical
The article How Power
Distribution Grids Work goes into extensive detail on how
power gets from the power plant to your house. The purpose of
the electrical system in a house is to distribute the
power safely to all of the different rooms and appliances.
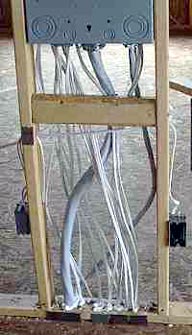
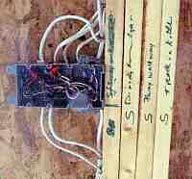
The electrician for this house first placed all of the
boxes for electrical outlets, lights and switches:
Then he ran wires from the fuse box to each box and between
boxes. Here's what the fuse box looked like once he got done:
Wires were first run through to the boxes. A lot of
drilling is necessary, both down into the crawl space and up
into the ceiling, as well as through studs to run wires
between boxes:
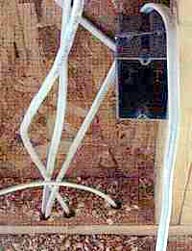
Wires are then pulled through the boxes, clipped and
capped:
This shot shows the water line for the refrigerator's
ice
maker as well as the refrigerator's electrical line. Note
the use of metal reinforcing plates at all holes (also visible
in the shot of the fuse box above):
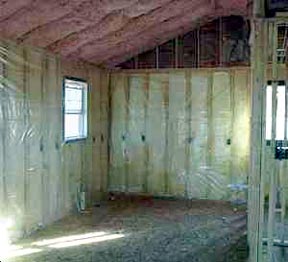
Insulation
The purpose of insulation is to
lower the heating and cooling costs for the house by limiting
heat transfer through the walls and the ceiling. The
insulation process starts by installing foam channels
in the eaves:
These channels guarantee that air will be able to flow from
the soffit vents to the ridge vents. Without these channels,
insulation tends to expand into the eaves and block the soffit
vents. This house uses standard fiberglass insulation
throughout:
Notice that over the insulation is a thin plastic vapor
barrier. The idea behind the vapor barrier is to keep
moisture that develops inside the house inside. Without the
barrier, here is what happens inside the wall in winter: Warm,
moist air moves through the drywall and into the insulated
wall cavity; at some point inside the cavity it becomes cold
enough for the moisture to condense, soaking the insulation.
The vapor barrier prevents this process. In older homes, the
siding and sheathing were so loose that air easily migrated
out before the moisture condensed, but that is no longer the
case so the barrier is essential.
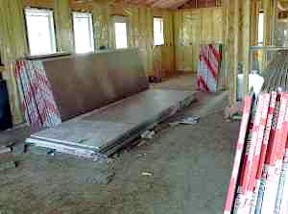
Drywall
On the outside, the house now looks
complete; but inside, it won't look "like a house" until the
drywall goes up. Drywall (also known as "plaster board"
and by the trade name "Sheetrock") is a half-inch layer of
plaster or gypsum sandwiched between two thick sheets of
paper. It is remarkably solid, and also remarkably heavy.
To finish this house, 134 sheets of drywall measuring 4
feet wide by 12 feet tall were delivered to the site and
stacked in the living room:
A 4x12 sheet of drywall weighs about 50 pounds (23 kg). So
this room has about 6,700 pounds (about 3,000 kg) of drywall
stacked in it!
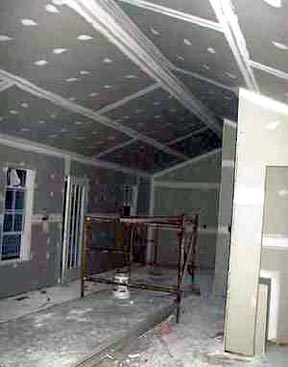
The drywallers put up all of the drywall in a day and
taped it the next day:
To "tape" the drywall means to cover all of the cracks and
nails with drywall mud (spackling compound) so that the
walls are completely smooth. You can see that the cracks and
nails are all covered in the pictures above.
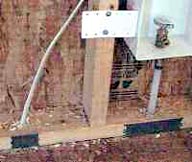
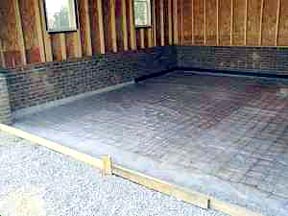
Garage Slab
The floor of the garage is a
4-inch-thick concrete slab poured very late in the process.
Four inches of gravel were placed on the ground and covered
with plastic and reinforcing wire. Around the edges, half-inch
thick homosote will allow the slab to contract and expand with
temperature changes. Once the prep work was finished, a
concrete truck came and poured about 7 cubic yards of concrete
to create the slab.
Finishing Up
At this point, the steps that
remain are all "finishing steps" and are things you can see in
your own home by opening doors and removing cover plates. The
finishing steps include:
- Putting down underlayment - The plywood put down
during the initial framing is called subflooring.
Generally it is covered by tar paper or 4-mil-thick plastic
as a vapor barrier and then by 5/8-inch particle board.
Alternatively, it may be covered with rigid concrete
wonder board for tile installations.
- HVAC - Once the underlayment is down, the HVAC
contractor will install the heating and air
conditioning unit (aka the furnace), the vents and all
duct work. If this had been a two-story home or a home built
on a slab, the HVAC people might have had to install some
ductwork in the walls or between floors. However, in a
single-story home on a crawl space or basement, the furnace
and all ducting can go in very late in the process because
everything goes under the house.
- Finish electrical - The electrician will return
and install all light fixtures, wall outlets, switches and
cover plates.
- Kitchen and bathroom cabinets and counters - The
cabinet company will install kitchen and bathroom cabinets.
They are simply aligned on the wall and screwed into the
wall studs. Countertops are screwed on top of the cabinets.
- Finish plumbing - Once the cabinets are in, the
plumber will return and install sinks, toilets and faucets.
The plumber will also install the water
heater if it was not installed during rough plumbing.
- Installation of well and septic system or hook-up to
city water and sewer - Depending on where the house is
located, it will either have a private well and septic
system or it will hook up to municipal water and sewer
lines. If a private well and septic tank are needed, the
contractor will bring in a well-drilling subcontractor and a
septic-tank subcontractor. Otherwise, the contractor will
call someone (either the municipality or a subcontractor) to
extend the municipal lines to the house. The plumber will
hook up the water and sewer lines.
- Wall trim - Once the cabinets are in, the
interior doors are installed and the molding around the
doors, windows and baseboards goes in.
- Paint - Once the molding is on, it is time to
paint and wallpaper the interior of the house.
- Carpeting and tile - Once the paint is done,
carpet and tile goes down.
- The final punch list - At this point, the builder
inspects the house, noting any problems. All problems are
tabulated on a punch list. The different contractors
return to fix all of the problems.
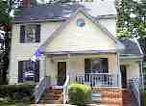
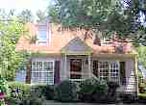
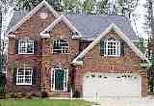
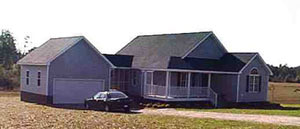
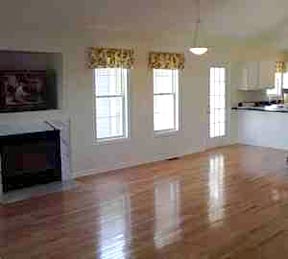
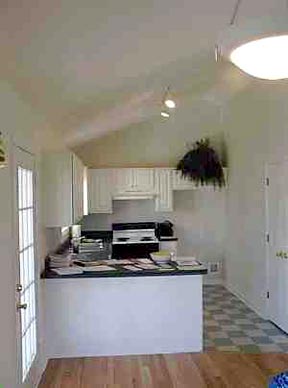
Once the punch
list is done, it's time to move in! Here are some shots of the
finished house:
This article has shown you the basic steps involved in
house construction. Obviously there are a lot of details that
we have omitted here, as well as a huge number of rules
embodied in the building codes. If you want to learn more, I
would recommend the excellent book titled Do
It Yourself Housebuilding, by George Nash.
The next time you walk into a house or start poking around
under it, I hope you do so with a much better understanding
and appreciation for everything that goes into making it work!
Lots More Information!
Related HowStuffWorks
Articles
More Great Links!